Category Archives: Batch Text Processing

Text Processing Automation Tool

Bitmap2LCD is a tool for programming small Graphic LCDs in embedded systems and a programmable text processing tool.

Text Processing Automation Tool

( Function described here was updated from Bitmap2LCD V2.8a  , and is available with the Standard Edition license )

One of the various features included in the bitmap2LCD GLCD toolbox is the Source Code / Text file processing.

To find and replace text in many files or if it is needed to search and replace different data 100+ times at once, or to proceed to many other text processing tasks , the Bitmap2LCD tool will help you saving precious time to search and replace text in the blink of an eye.

You can program batch scripts of your repetitive text-processing tasks such as auto-replacement or/and auto-insertion of any text in your source code, save it to the disk (.SPP) and define it as the current active batch of a project.

The list of functions in the batch script makes it possible to search automatically for text strings within the code and based on the paired actions, decide whether the alternative text string shall overwrite the text string searched for, or be placed after it.

 Here’s the list of the functions available in the bitmap2LCD text processing tool

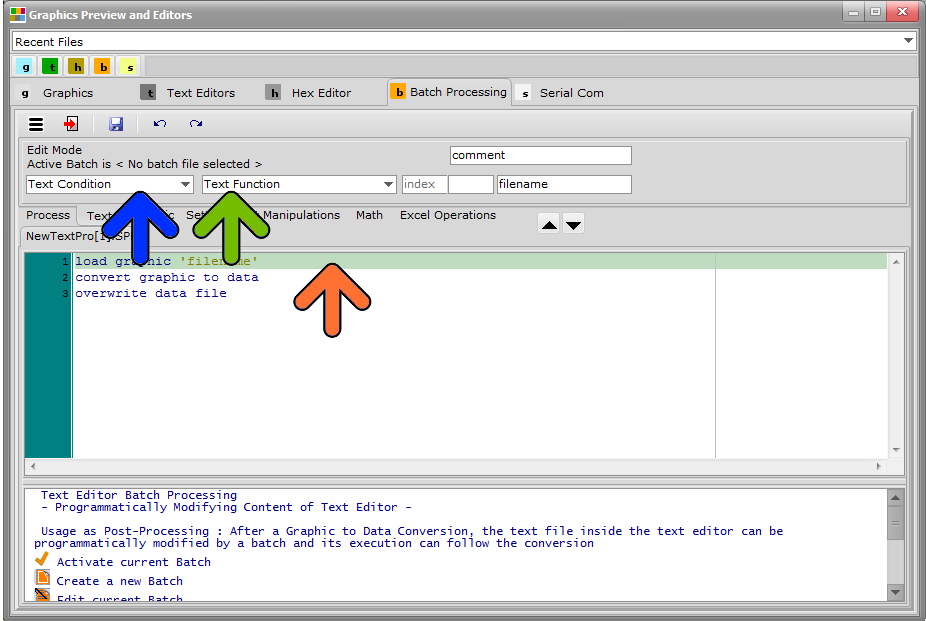
( Note : Addition of new functions in the future , also see blue arrow below in fig1. )

List of the conditions and modal switches

if ‘text’

if not ‘text’

while ‘text’

if line number(index)

if last line

if flag

if not flag

and ‘text’

and flag

and not ‘text’

and not flag

or ‘text’

or flag

or not ‘text’

or not flag

begin of loop

end of loop

search back from line end

search from line begin

case sensitive on

case sensitive off

..

List of the functions

then set flag

then reset flag

then insert (index)’text’

then overwrite (index)’text’

then remove ‘text’

then delete until ‘text’

then get integer (index)

then get hex (index)

then get float (index)

then insert integer (index)

then insert hex (index)

then insert float (index)

then next line

then delete line

then insert line

then save as ‘file’

then start copy

then stop copy

then start delete

then stop delete

then save copy as ‘file’

then load and insert ‘file’

etc..

To program a batch , click Edit Current Batch or click New batch ( buttons are located in the main menu )

bitmap2lcd-batch-processing-menu

bitmap2lcd-batch-processing_3

fig. 1

Then choose the conditional function in the Function combo box (blue arrow)

You can’t directly edit the text itself in the editor, but you can move the green cursor up and down in the program (orange arrow) and edit the index , text and comment fields of the line selected by the cursor, in the fields at the top of the editor (green arrow).

Note that the index field can be left at ‘index’ when the cursor position is not known nor fixed : Index is a numeric field , a cursor position of character or text or if left at ‘index’, it will be the cursor position where the searched ‘text’ was found in the conditional instruction before (‘if’) .

An IF followed by one or more THEN is a pass thru the whole text file loaded in the Text Editor (second tab fig1. ) Please remember that every IF + Then(s) Pair is a new pass from the top to the end of the text file.

In the above examples in fig1. and fig2 , a part of the file is copied in another file named copy3.txt located in the folder defined as output files folder .

bitmap2lcd-batch-processing-menu_2

fig 2.

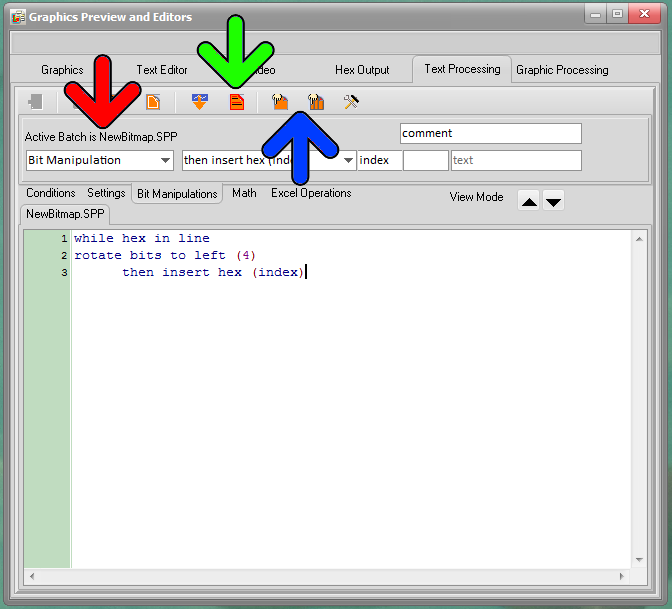
The Processing batch can be started from the user interface, from a single button (see red arrow) or from a main menu item.

See also the article about the automatic post-processing in this topic.

Example of Text Processing : Modifying Hexadecimal Values

Bitmap2LCD is a tool for programming small Graphic LCDs in embedded systems and a programmable graphic and text processing tool.

Example of Text Processing

Modifying Hexadecimal Values

Example of Rotating of 1 bit to the left of all hex values found in the text editor line, function repeated  on every editor line where a Hex Value is found.

Hex data before processing  0x01  0x02  0x03  0x04  0x05

Hex data after Processing     0x02  0x04  0x06  0x08  0x0A

Batch program :

while hex in line
      then get hex (index)
rotate bits to left (1)
      then overwrite hex


Bitmap2LCD : Text Processing Functions

Bitmap2LCD is a tool for programming small Graphic LCDs in embedded systems and a programmable graphic and text processing tool.

From Bitmap2LCD V2.9 and upwards

Bitmap2LCD : Text Processing Functions

Note : Additional Processing functions will be implemented in the future

The batch conditions and functions listed below, are available for programaticaly modifying the text editor content. A condition block (IF.. / WHILE..) can be followed by one or more functions (THEN..) A single condition block applies from the first to the last line to the whole text editor content. Next condition block again applies to the whole editor content…

Internal Batch System Variables

The batch system has internal variables holding informations such as :

Internal Index : The char index (or position) in the text editor line, where a ‘text’ or an other data has been found. This internal index can be used in a following ‘then’ function by letting ‘index’ as it is next to the function (= no index number)

Internal Text Buffer : A text buffer where lines can be copied to

Current Hex Value : The last Hex value found for example by the get hex function

Hex Length Value : The Length of a hexadecimal value

Current Integer Value : The last Integer value found for example by the get integer function

Current Float Value : The last floating point value value found for example by the get float  function

Current Flag : A boolean status flag ( True or false )


Undefined Conditions

if unconditional

Unconditionally Set condition = True , execute list of functions on any text editor line

Hexadecimal Conditions and Functions

if hex in line           

Condition = True when a hex string (as user defined in the configuration settings ) is found in the line ( A hex value is defined by its prefix or suffix  ( for example prefix like 0x or $ or a suffix like h

while hex in line

Condition is and remains true while a hex value is found in the line, usefull for example, in a line of 16 hex values.


then get hex (index)

If condition was True, gets the hex value specified by index ( first hex value index being index = 0 )  Internal Index variable holds the char index where the hex value has been found.


then insert hex (index)

If condition was True, Inserts the current hex value in string on position specified by index.
If no numeric index specified, inserts hex on Internal Index value.


then overwrite hex

If condition was True, overwrites the current hex value in string on position on current index position.


Text and  Conditions and Functions


if ‘text’           

Condition = True when the defined string under ‘text’ is found in the line

Internal Index variable holds the index where ‘text’  has been found.


if not ‘text’           

Condition = True when the defined string under ‘text’ wasn’t found in the line


while ‘text’           

Condition is and remains true while the defined string under ‘text’ is found in the line

Remark : The defined ‘text’ might be deleted or modified in a function afterwards to prevent a loop without end.


and ‘text’  ,  and not ‘text’ ,  or ‘text’ ,  or not ‘text’  

self speaking conditions, to extend if conditions


then overwrite (index) ‘text’

If condition was True, overwrites text editor line from index position with specified ‘text’

Uses internal index value if index was’nt specified


then insert (index) ‘text’

If condition was True, inserts in text editor line from index position the specified ‘text’

Uses internal index value if index was’nt specified


then remove ‘text’

If condition was True, removes in the text editor line, the specified ‘text’


then delete until ‘text’

If condition was True, deletes chars in the text editor line from the internal index position to the position of ‘text’


Line Number Conditions and Functions

if line number (index)

Condition = True if line number of text editor has been reached


if last line

Condition = True if last line of text editor has been reached


then delete line

If condition was True, deltes the current text editor line


then next line

If condition was True, jumps to the next line of text editor


then insert line

If condition was True, inserts a line at current line of text editor


Flag Conditions and Functions

if flag           

Condition = True when flag was previously set


if not flag           

Condition = True when flag was’nt previously set

then set flag

If condition was True, gets then sets the flag

then set flag

If condition was True, then clears the flag

and flag  ,  and not flag ,  or flag ,  or not flag  

self speaking conditions, to extend if conditions


Other Conditions and Functions

then save as ‘file’

If condition was True, then copies the content of the text editor as it is now to a filename defined under ‘filein the user defined Output Files Path ( Note : No path or folder allowed in ‘file’ )

then start delete

If condition was True, then sets a start of deletion flag at current text editor line

then stop delete

If condition was True, then , if start delete has been found upwards in the text editor, deletes all the lines from Start to Stop delete position.

then start copy

If condition was True, then sets a start of copy flag at current text editor line

then stop copy

If condition was True, then , if start copy has been found upwards in the text editor, copies  all the lines from start to stop copy position to the internal text buffer

then save copy as ‘file’

If condition was True, then copies the content of the internal text buffer to a filename defined under ‘filein the user defined Output Files Path ( Note : No path or folder allowed in ‘file’ )


then load and insert ‘file’

If condition was True, then loads an external text file defined under ‘file‘ located in the user defined Output Files Path and inserts the  text into the text editor ( Note : No path or folder allowed in ‘file’ )


Bitmap2LCD : Batch Programming

Bitmap2LCD is a tool for programming small Graphic LCDs in embedded systems and a programmable graphic and text processing tool.

From Bitmap2LCD V2.9 and upwards, article update V3.6h

Note : Additional Processing functions will be implemented in the future

Bitmap2LCD : Batch Programming

A batch program is a set of conditions, functions etc… one per line.

The program can’t be edited directly by writing texts. Any action must be made inside the field indicated by the red and green arrows. Cursor is a highlighted line. Cursor moves are made using keyboard up and down keys or by clicking on the destination program line.

  • Use the tabs to browse the group of basic functions ( Blue arrow )
  • Use the Comboboxes to select and program the condition/setting or function. ( red arrows ) In the Edit Mode, insert the selected function as next to the current cursor position with return key.
  • Use the Edit fields ( green arrow ) to edit a constant like an index (numeric), a text (chars) or a comment (chars)
  • Call the pop-up menu ( purple arrow ) by clicking the right mouse key inside the white program field.
  • Move up or down a program function with the up and down buttons ( gray arrow ) or use alternative CTRL+UP and CTRL+DOWN key combination
  • Next to the gray arrow, a label indicates the current View or Edit mode : A Batch can only be modified in Edit Mode

bitmap2lcd Batch Programming_2

Update V3.7c

Buttons have been moved into the main menu !

bitmap2lcd-batch-processing-menu

To start a batch processing, it must be active ( red arrow ) ( You can have many batch programs on disk to choose from )

Activating a batch can be made with a button ( green arrow ) or by clicking an item in the pop-up menu (Right Mouse click)

A batch processing can be started with two buttons : ( blue arrow ) A single processing (left side of blue arrow) or a processing on multiple files located in a defined folder (right side of blue arrow ). A processing can also be started in the Batch Processing main menu.

Batch Processing files ( .SPP  ) are always located in the defined Project Output Files folder. To view a list the batches on disk, click on the list batch button or use the pop up menu item.

Text Processing Example : Modify a Hex value on every source code line

Bitmap2LCD is a tool for programming small Graphic LCDs in embedded systems and a programmable text processing tool.

Text Processing Batch Example

Target : Modifying a Hex value on every source code line

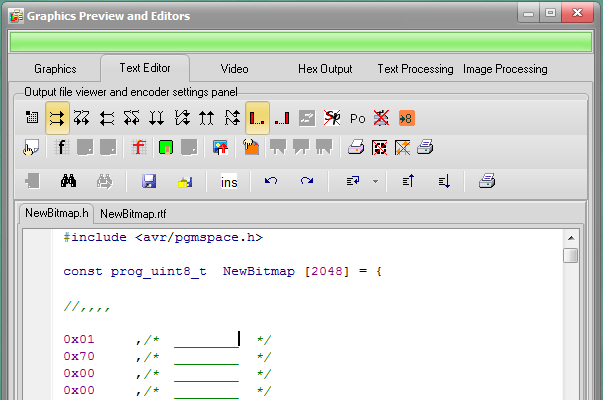
  • Convert an image to code : The code array then is visible in the Text editor ( see below )

Example here see the two first hex values : 0x01 and 0x70

Bitmap2LCD Batch Text Processing 1


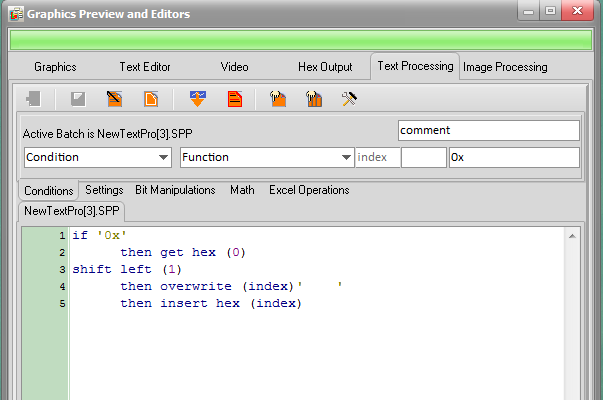
In the Text Processing Window, create a new batch and write this program, using the choice comboboxes and the editors located upwards the program lines :

Bitmap2LCD Batch Text Processing 2

if ‘0x’
      then get hex (0)                         –> Hex value prefix is already 0x in the configuration settings
shift left (1)
      then overwrite (index)’    ‘    –> 4 x space inside the string
      then insert hex (index)

Remark : Everything between two “if conditions” is one block of functions for this “if condition” !

On every text editor line, checks if ‘0x’ is found and if condition is “true”, gets the first hex value (index 0) , shifts left  the hex value of 1 bit to the left , overwrites source from the index where the ‘0x’ was found with four space chars,  and finally inserts the shifted hex value at the index position…

Activate the new batch and run it over the text editor.

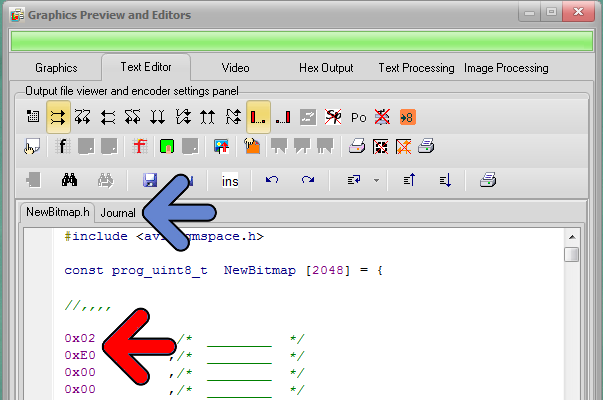
Bitmap2LCD Batch Text Processing 3

The source file in the Text Editor has been modified (red arrow)

You can read the processing report journal (blue arrow)


Bitmap2LCD : Running a Processing Batch

Bitmap2LCD is a tool for programming small Graphic LCDs in embedded systems and a programmable text processing tool.

Running Processing Batch run runx

Article updated for V3.7c

There a many ways to run a Processing Batch :

  • Loading a Batch Program file into the text editor, start the active text processing batch for a single run run
  • Manually running a batch after conversion of a GLCD image or after conversion of a GLCD font, data being present in the text editor.
  • Chain an automatic post-processing after every image or font conversion.
  • Running a Processing batch on multiple defined files in a defined folder runx

The active batch (blue arrow) will be started in case of “manual” starts

bitmap2lcd-batch-processing-menu_2

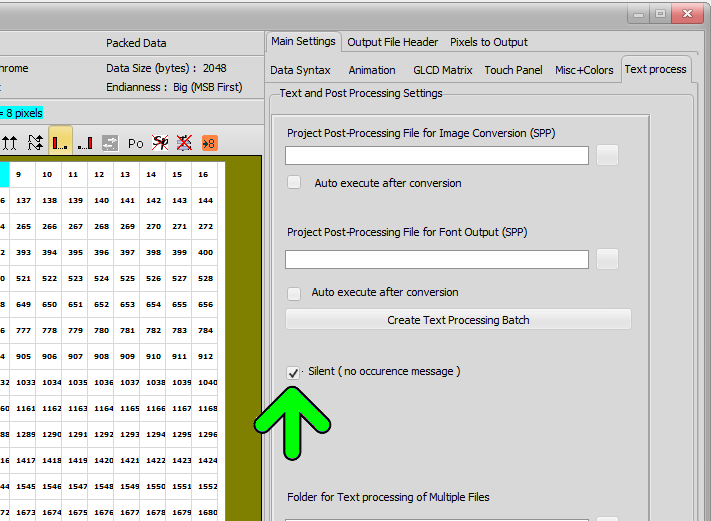
if the Silent checkbox is checked (green arrow fig 2) , the message on screen with the number of processing occurrences found at the end of the text processing will not be displayed. ( Not needed in case of multiple file text processing )

Bitmap2CLD Running Text Processing 2

fig 2)

Bitmap2LCD : Activate a Processing Batch

Bitmap2LCD is a tool for programming small Graphic LCDs in embedded systems and a programmable text processing tool.

Activate a Processing Batch

1. List the existing batches (blue arrow)

2. Click the selected Processing batch in the list inside the File Explorer

3. The selected Batch Processing Program appears in the editor window

4. Activate the present Text Processing  Batch (red arrow)

5. The activated batch filename appears in the menu (green arrow)

Another way to select a batch is to right-click in the batch list after having selected the wanted batch. In the pop-up menu, there’s an item to do that.

bitmap2lcd-batch-processing-activate


Bitmap2LCD : Text processing on multiple files located in a folder

Bitmap2LCD is a tool for programming small Graphic LCDs in embedded systems and a programmable text processing tool.

Text processing on multiple files located in a folder

From Bitmap2CD Standard Edition V2.8d, a text processing batch can be run on defined multiple files located in a defined folder.

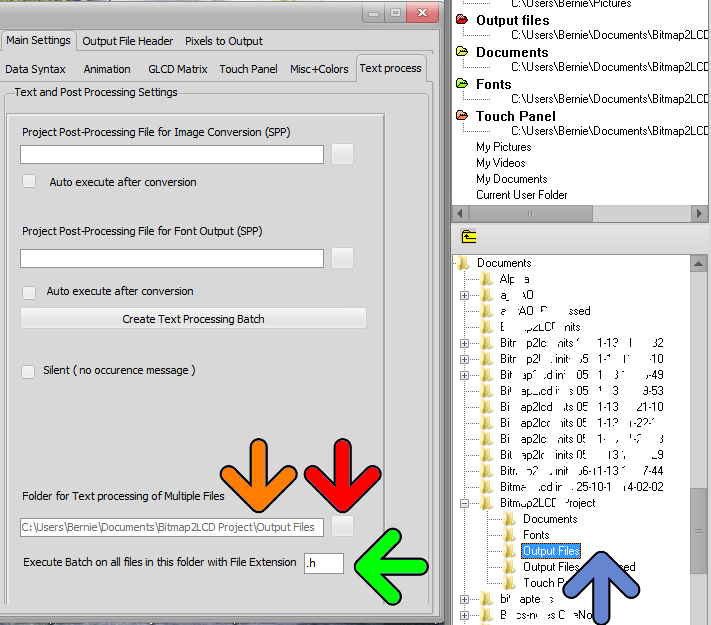
1. In the File Explorer, select the folder where the source files are located  (blue arrow, fig 1)

2. Open the Configuration Settings Panel , click the Text Process tab

3 Click on the Folder Select button (red arrow)

4 The selected folder appears in the field (orange arrow) This field will be saved with the configurations settings when closing the program.

5. Define the file extension, for example : “.txt”  or “.csv”  or “.h”  Only the files with this extension in the folder ( case sensitive ) will be text processed.

Bitmap2CLD Multiple File Text Processing 1

fig 1)

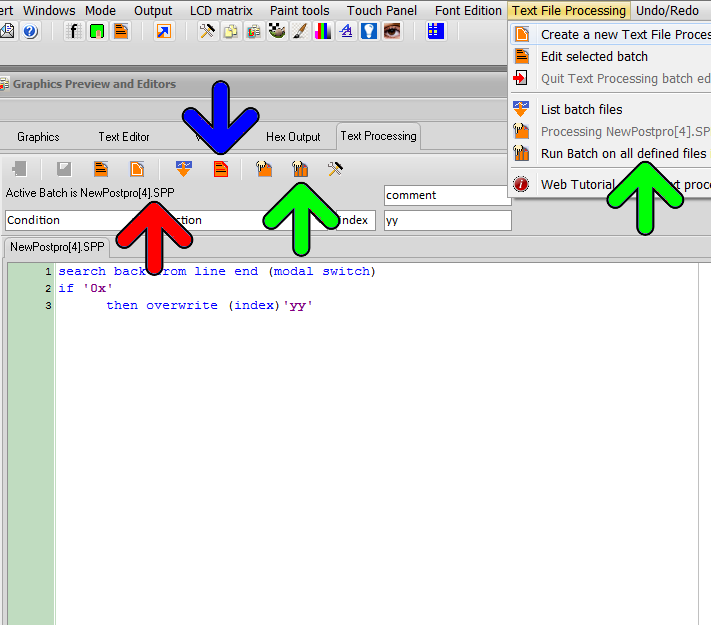
The selected batch (see red arrow fig 2) can be started from the menu or from the text processing panel (green arrows fig2)

If no batch allready activated, list the batch files with the button at the left of blue arrow, choose the batch you want to run in the list and activate it ( blue arrow fig2 )

Bitmap2CLD Multiple File Text Processing 2

fig 2)

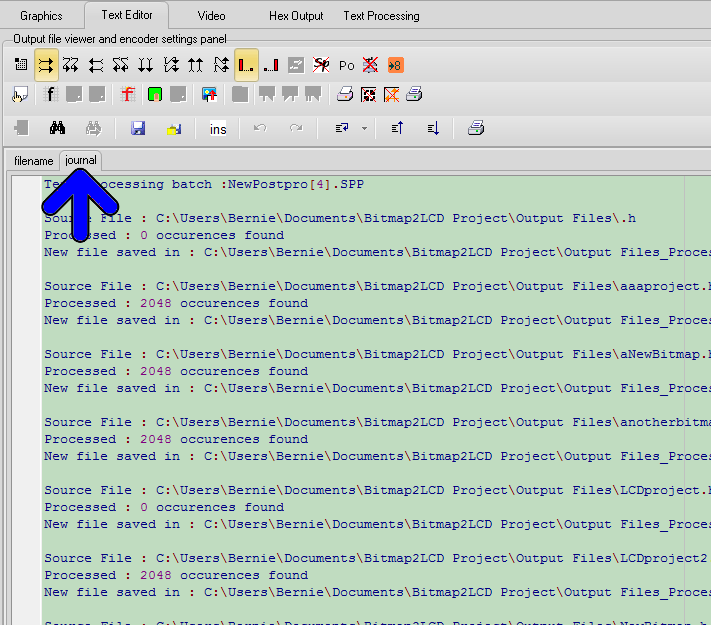
At the end of a Multiple file Text processing run, a journal is displayed (fig 3 below)

It lists the source folder and file, the destination folder and file and the number of Text processing occurences found

The destination folder is the source folder name + _processed

The source files in the source folder are not modified

Bitmap2CLD Multiple File Text Processing 3

fig 3)