Tag Archives: data array

About GLCD Data Compression

Bitmap2LCD is a tool for programming small Graphic LCDs in embedded systems.

 Update V3.9H

A simple data compression feature, for the output of GLCD data arrays is implemented in Bitmap2LCD

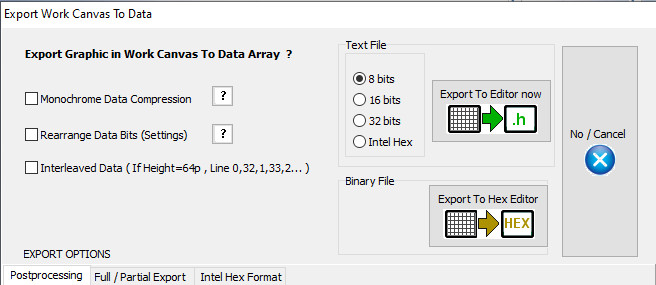
This function is only available for monochrome mode and 8 bit output format.

The 8 bit microcontrollers for price sensitive projects are circuits with often less onchip memory space than most of the 16 or 32 bit devices.

The target is to save as many as microcontroller flash memory as possible. As tables for full display patterns of for example a 128 x 64 dot matrix LCD need 1024 bytes each, the goal of this function was to save flash space for more code or graphics or just to reduce the overall flash capacity and therefore to sink the price of the MCU chip.

The microcontroller firmware has to be able to handle these tables with a special code, which decodes the compressed data. Processing time for decompression has to be allowed.


How does it work ?

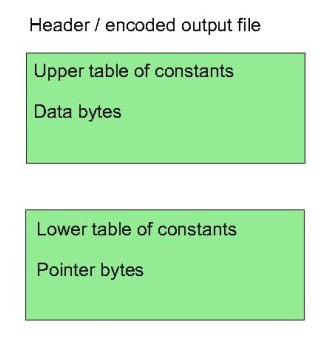
Instead of only converting the black and white pixels found in the work canvas to a linear list of n bytes, with the data compression method explained here, the data array is split into two separate arrays in one single output file : one as usual for the data stream and another for the pointers of each data groups.

Compr1

The basic concept of this compression is based on making groups of consecutive identical data bytes in the data array.


Consecutive identical byte chains, and consecutive different byte chains are handled, the goal here is to save data bytes when a consecutive identical byte chain is found. While the first pointer of a consecutive different bytes chain is a loss of one data byte stored as a pointer, a consecutive identical byte chain of 10 bytes is a win of 8 bytes, the data being written only once in the data array. The count of them is then stored in the pointer byte array part.

The maximum count of consecutive data, identical or different is limited to 127 ( pointer bits 6 to 0 ). If a data count in a group reaches 127, a new group is encoded.

compr2

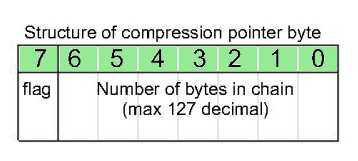
The bit 7 of the pointer byte is the flag for the compression decoder. A 1 (high) is for a chain of identical data bytes, and a 0 (low) is for an chain of different data.


When data compression is active, Bitmap2LCD converts all data and shows the compression rate in the compression statistics at the end of the output file.


This method of compression shows different results in vertical or horizontal orientation conversion, it depends of the LCD graphic !

If possible, before to choose the LCD controller and its specific data orientation in Display RAM , you could try both orientations and compare the possible compression ratios.


In the Header Include file, the example script below shows how to setup the compression table information.

( It is an example for a GNU-C compiler for ATMEL AVR family )

Everything after the tag [&COMPRESSION] is a script information for the data compression function.

The tag [&CNAME] is replaced in the output table name, by the data array name

with an additional suffix _x ( For example : Newfile_x )

The tag [&CSIZE] is not used yet (v2.3)

In the Header Include file :

[&COMPRESSION]
const prog_uint8_t [&CNAME][&CSIZE] = {

 Please also check the online forum for other topics about this function

Compression Decoder Example

The below example of a function in C language, decodes compressed data arrays converted with bitmap2LCD.

It is for an Atmel AVR target MCU with GCC compiler, a T6963C LCD controller ( horizontal byte orientation from left to right )
No buffer RAM.

Note : For LCD module widths greater than 255 dots, x and width variables should be long integers


// T6963 function for uncompressed bitmaps
 
void GLCD_Bitmap(unsigned char *bitmap, unsigned char x, unsigned char y, unsigned char width, unsigned char height)
{
unsigned char val;
uint8_t LcdX,LcdY,EndX,EndY;
long ip = 0; // table byte counter
LcdX=x; // LCD dot adress X
LcdY=y; // LCD dot adress Y
EndY=y+height-1;
EndX=x+width;
 
while (LcdY < EndY || LcdX < EndX)
{
GLCD_GraphicGoTo(LcdX, LcdY);
GLCD_WriteDisplayData(pgm_read_byte(bitmap + ip));
ip ++;
LcdX=LcdX+8;
if (( LcdX == EndX ) && ( LcdY<EndY ))
{
LcdY++;
LcdX=x;
}
}
 
}
 
 
// T6963 function for Bitmap2LCD compressed bitmaps
 
void GLCD_xBitmap(unsigned char *bitmap, unsigned char *pointer, unsigned char x, unsigned char y, unsigned char width, unsigned char height)
{
 
unsigned char val;
uint8_t p,pv,nb,LcdX,LcdY,EndX,EndY;
long ip = 0; // table byte counter
p = 0; // pointer
LcdX=x; // LCD dot adress X
LcdY=y; // LCD dot adress Y
EndY=y+height-1; // End pixel in Y
EndX=x+width; // End Pixel in X
 
while (LcdY < EndY || LcdX < EndX)
 
{
pv = (int)(pgm_read_byte(pointer + p)); // read the pointer byte
p++;
 
if (pv > 128) // bit 7 is logical high when identical bytes chain, low when different
{
val = pgm_read_byte(bitmap + ip);
ip++;
nb = pv – 128;
 
while ( nb > 0 ) // substract bit 7 value for number of bytes in chain
{
GLCD_GraphicGoTo(LcdX, LcdY); // bytes in chain are identical
GLCD_WriteDisplayData(val);
LcdX=LcdX+8;
nb–;
if (( LcdX == EndX ) && ( LcdY<EndY ))
{
LcdY++;
LcdX =x;
}
}
}
else // bytes in chain are different
{
while ( pv > 0 )
{
GLCD_GraphicGoTo(LcdX, LcdY);
GLCD_WriteDisplayData(pgm_read_byte(bitmap + ip));
ip ++;
LcdX=LcdX+8;
pv–;
if (( LcdX == EndX ) && ( LcdY<EndY ))
{
LcdY++;
LcdX=x;
}
}
}
}
}


Creating a GLCD Animation from scratch with Bitmap2lcd

Creating a GLCD Animation from scratch with Bitmap2lcd

Bitmap2LCD is a tool for programming small Graphic LCDs in embedded systems.

Also read this article !

Let’s see how we can create an animation for small Graphic LCD ( Version 3.7C+ )

bitmap2lcd-animation-menu

  • When in static mode , go to the animation tab and click the Enter Animation button anim  The same button or the Special Mode Exit exiz Button should later be used to exit from the animation mode back to the static mode. An animation will be saved as a standard GIF file.

 Read more about GIF Format

  •  When entered in animation mode, the canvas outline becomes dark gray (green arrow) sub-menu becomes accessible (red arrow) . The animation is a sequence built of frames. The “ghost image” of the previous frame can optionally be displayed, it is a visual help for correct placement of graphic items,
  • bitmap2lcd-animation-mode_1
  • At the top you can read the number of the current frame  (2)  and the number of total frames in the animation (/2) (blue  arrow)
  • In the animation menu , you can use the navigation buttons to move from a frames to another, move to the beginning or the end of the animation. You can play and stop the animation sequence. (orange arrow) An alternative is to use the page-up and page-down keyboard keys to move through the animation frames.
  • Addition of a new animation frame, copying current frame to then next new frame , deleting a frame as well as other animation management functions are located in the animation menu and at the right side of the work canvas (red arrow)

Bitmap2lcd Animation_3

  •  When the animation is done you can convert the frames in GLCD data in one go Start  (green arrow)
  • With this animation made of 5 frames example, Bitmap2LCD produces 6 files : A clip unit file  (the code in the editor) and the 3 frames as data files  (orange  arrow)
  • You can navigate and view these files with the next and previous buttons  (red arrow)
  • Only selected part of the animation frames can be converted : Enable Display Paging Scheme Limits and then select the area to convert. Click conversion button to start data export as usual (green arrow)

Bitmap2lcd Animation_4


  •  In this example, 5 full frame size of data for  a 128 x 128 pixel GLCD are converted (black arrow). If the “Auto-framing” option has been enabled in the configuration settings, an automatic framing of only the area of the changing pixels is made. Then the X and Y positions, the height and the width of the frame is reported inside the clip unit.
  • In the configuration settings window toolAnim , find other animation settings on the “clip unit” panel.
  • In the monochromatic mode, in addition to then auto-framing, an animation output can optionally be “internally compressed” to generate reduced code size. ( read articles in the blog category GLCD Data compression )


Bitmap to GLCD Hex file >> Output settings

Bitmap2LCD is a tool for programming small Graphic LCDs in embedded systems.

Go to the Main Settings (v2.5 +):

bitmap2lcd settings

From V2.5, the below settings can also be found on the file explorer window, outputs tab : there’s a button at the top right to hide or show this toolbar.


fig 1. Hex file output settings buttons [ Bitmap2LCD from V2.0 upwards ]


Bitmap2LCD is a universal programming tool for converting bitmaps/images to GLCD for most graphic LCD controllers. (Monochrome,Grayscale, and Color ->[Color from V2.0] )

The software converts the bitmap and generates a hexadecimal file according to the previously defined user settings.

Here’s a short description of the available settings :

The hexadecimal output format can be selected with a series of buttons located in the output panel (fig 1.)

Description of the settings:

  • The choice of 8 different vertical or horizontal pagings ( the buttons with the arrows ) , your choice depends of the GLCD controller which is built in your LCD module. ( Please refer to the GLCD controller datasheet )
  • Most significant bit is first or is last (Data bit 7) — or in other words the data endianness.
  • Byte nibble swap On/Off, for example for 16 gray level grayscale mode for Sitronix ST7528 controller compatibility. ( In the case of 2 pixel per data byte, 4 bit per pixel data, gray levels )
  • Negative or positive output setting
  • GLCD zero corner selection (Corner where the conversion starts)
  • Output File Header Editor , (A small script to configure Hex file header)
  • Enable/Disable of the Output Data for compression for monochrome GLCD.
  • Enable/Disable 6 or 8 bit Data byte wide output for T693C Controller

As the converted output can just contain a part of the display size, there are other selectable options (not on fig1.)

  • Enable/disable X,Y area coordinate data insertion in the Hex ouptut file
  • Enable/disable area size data insertion in the Hex output file

These configuration settings are saved when you quit the application and restored on application launch. These settings are also a part of the project specific configuration.

Find other available settings in this topic.